
Getting Started in Helicopter Turbine Aviation
An ideal training helicopter for beginners
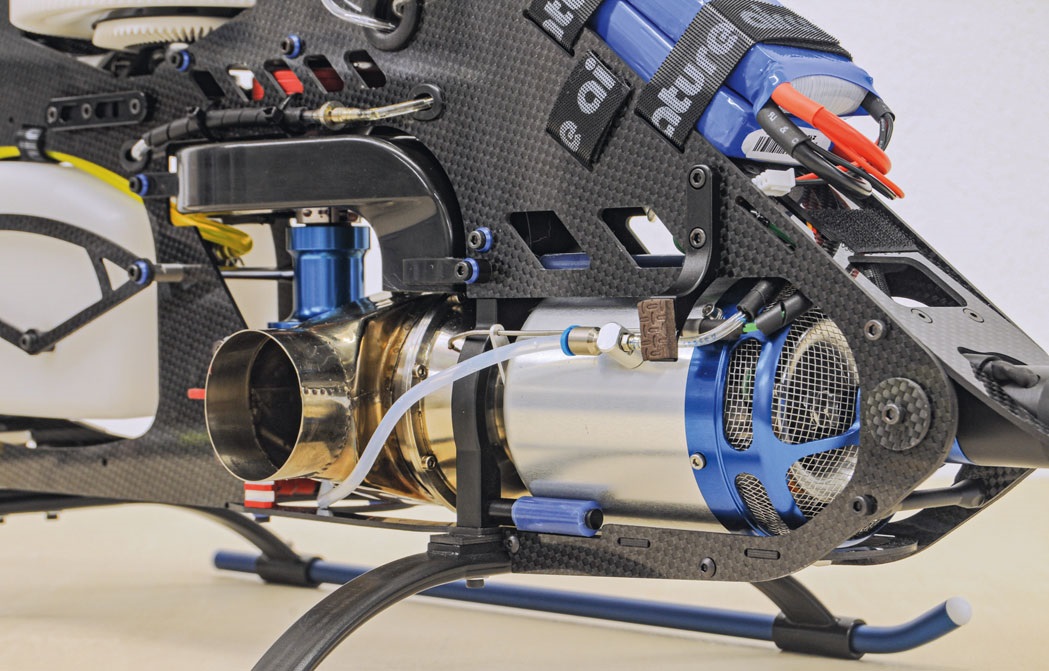
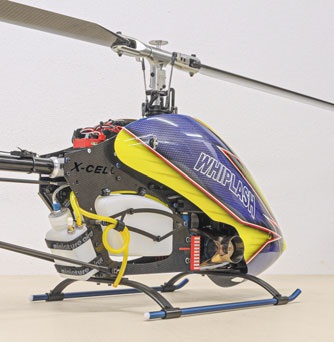
For many RC pilots, a turbine engine is the Mercedes of powerplants—whether in an airplane, jet, glider, or, as in our case here, an RC helicopter. Just owning one is often a dream come true. This model was exhibited and flown by Miniature Aircraft USA at the 2022 spring meet in Loorholz, which further piqued my client’s interest.
The turbine trainer is powered by the TS 45i Whiplash Special Edition from Turbine Solutions. There is now also a trainer version that can accommodate the increasingly popular Xicoy X45. With the Whiplash family, Miniature Aircraft USA is the only manufacturer to offer all types of propulsion for RC helicopters in a single series: electric, nitro, gasoline, and, of course, turbine. These are not merely “conversions or adaptations”; rather, each model is specifically designed for its respective power source and is continuously tested by company owner Josef Schreiner and his factory pilots. The TS 45i from TURBINE SOLUTIONS was launched in early 2022 specifically for the Whiplash Turbine II in a special edition designed to match. The kit and accompanying accessories are available from stock at the Swiss importer swiss-scale-helikopter.ch. This company is also responsible for importing TURBINE SOLUTIONS turbines into Switzerland. The average delivery time for the turbines is about four weeks.
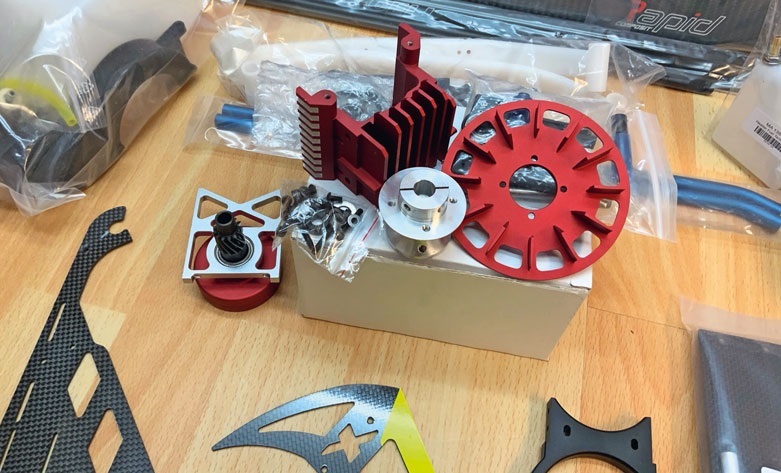
Once you open the package, the large, extremely high-quality-looking CFRP side panels immediately catch your eye. The other components—with the exception of the tail pipe and its associated fixed drive shaft, as well as the landing skids and the fuel tank—are sorted and packed into individual, labeled cardboard boxes according to their assembly groups.
Upon closer inspection, it becomes apparent that plastic parts have been reduced to a minimum, and nearly all parts are made of high-quality solid carbon fiber (without any glass fiber or G10 components, as is quite common with many other manufacturers) as well as high-quality aluminum. There are only a few parts, such as the ball joints and drive pinions, that are made of plastic—albeit very high-quality plastic. The CNC-milled gears make an extremely sturdy and solid impression. The fully painted canopy also leaves nothing to be desired. The assembly process was divided into several stages. As expected, the easy-to-understand assembly manual is clearly laid out and poses no challenge for the ambitious model builder. The complete assembly manual is available for download and is kept up to date by Miniature Aircraft USA.
With the pre-assembled swashplate, all that remains is to install the steel balls. The thrust bearings for the blade holders are already properly pre-assembled and greased at the factory, so all that’s left to do is install the link arms. After assembling the blade holders and the center piece around the 9-mm-thick blade bearing shaft, the high precision of fit between the individual components is immediately apparent. The black anodized swashplate provides a pleasing contrast to the sandblasted and anodized blade holders as well as the center piece, making it a visual highlight.
Just like the main rotor head, these parts of the solid tail assembly are also sandblasted and anodized, giving them an extremely solid appearance. The tail section features an aluminum-milled gear on the tail rotor shaft, which is driven by a polyoxymethylene (POM) pinion on the rigid drive shaft. The special hard anodized/Teflon coating on the aluminum gear, combined with the POM gear, results in a maintenance-free tail gearbox. To achieve the smoothest possible operation, the guidance of the rigid drive shaft within the tail tube has also been meticulously designed and implemented using multiple O-rings per bearing unit. After the final assembly of the rear unit, the completely play-free, smooth operation of the entire rear steering system is immediately noticeable.
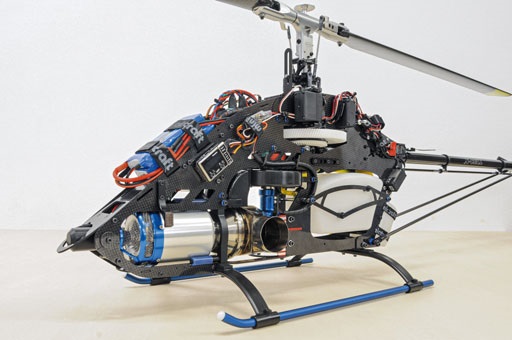
In the first step, all the spacer plates for the components—the black anodized bearing blocks milled from aluminum, the attractive red “motor mount,” and the servo mounts—are installed and then screwed onto the first side plate of the chassis along with the necessary struts. Only then is the chassis closed with the second chassis plate.
Next, the bottom assembly is installed for the first time without securing it with threadlocker, since our turbine still needs to be mounted into the mechanism from below. By “pre-assembling” the bottom plate, the chassis can be checked for straightness and perpendicularity before installing the turbine. Finally, the unit consisting of the helical-toothed main gear, the plate, and the freewheel is assembled and also mounted into the chassis. The final step is the installation of the clutch unit with the drive pinion.
After the fan wheel has been installed and aligned with the coupling rotor on the “motor shaft,” the entire turbine unit is slid into the mechanism from below and mounted on the motor bracket. The front section of the turbine (also called the gas generator), which houses the combustion chamber, is additionally supported by four separate rubber-damped mounting elements. →
Fixed mounting points are provided or planned within the mechanical assembly for the turbine’s additional components, such as the electronics, valves, and fuel pump. For example, there are pre-drilled holes for the valves, allowing them to be easily secured using the included screws. Next, the bottom assembly and the landing skids are installed.
Once the chassis with the turbine is complete, the tail tube, tail struts, and main rotor head are installed as usual. As expected, the entire mechanical assembly gives the impression of being extremely stable and torsionally rigid. It’s very impressive that all the gears run smoothly and quietly, and the milled main gear runs perfectly in its track.
The 0.9-liter fuel tank is mounted entirely on rubber buffers and is secured in its designated position only at the very end. The package includes the header tank, 0.125 liters (also called a hopper tank). This tank ensures a “bubble-free” fuel supply to the fuel pump.
Many necessary small parts, such as the tank pendulum, fuel hoses, connectors, Y-connectors, Velcro straps, etc., are also included in the package.
Installing the electronics and routing all the cables and fuel lines is easy, and there is plenty of space available.
The Whiplash Turbine II is equipped with the following electronic components: three BLS275V and one BLS276SV servos, as well as the CGY 760R flybarless system—all from FUTABA. You’ll also need two LiPo batteries. One powers the servos and the flybarless system, and the other powers the turbine.
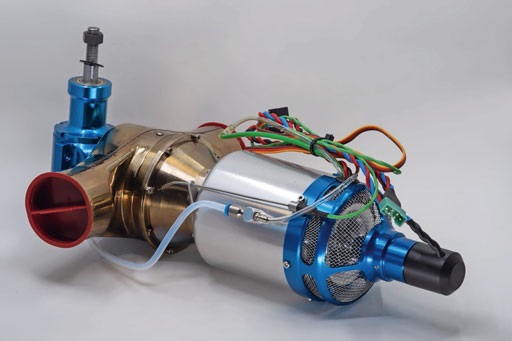
For many turbine pilots, the name WREN Turbines has long been synonymous with reliability and excellent service. In early 2019, WREN Turbines was acquired by TURBINE SOLUTIONS, owned by Paul Hardman.
A bit of history: Long before Paul Hardman acquired WREN Turbines, he worked at Wren himself. As his expertise grew, he eventually struck out on his own and founded TURBINE SOLUTIONS. In 2019, Paul had the opportunity to acquire WREN Turbines. TURBINE SOLUTIONS develops and manufactures RC jet and helicopter turbines and offers a full range of services related to RC turbines.
Then, at the end of 2019, news broke that TURBINE SOLUTIONS would be releasing an optimized turbine for the Whiplash, called the “Whiplash Special Edition TS-45i Heli Turbine.” The TS 45i Heli is a further development of the well-known WREN 44i. The TS 45i Heli impresses with its quick response time and highly dynamic power delivery. This is particularly well-suited to today’s flying styles. The maximum power at the output shaft is 7 PS/5.2 kW at 190,000 revolutions per minute, and the turbine is “full-throttle-rated.” Of course, this turbine is shipped with a kerosene start-up system. All parts required to operate the turbine are included in the scope of delivery. This includes the electronic control system (known as FADEC or ECU). This system regulates and monitors all parameters and components of the turbine necessary for startup, operation, and the cooling process (e.g., fuel pump, valves, RPM, temperature...). Data from the control system can be retrieved via a data terminal or telemetry (using an optionally available telemetry module).
The TS-45i helicopter turbine is a two-shaft turbine and is therefore based on the same principle as the turbines in manned helicopters.
A two-shaft turbine consists of two assemblies or stages. The first stage, known as the gas generator, resembles a jet turbine and contains the first shaft. In this stage, the kerosene is burned, and the entire power output is available in the exhaust jet. This exhaust jet then “blows” onto the second stage of the turbine engine, thereby driving a second shaft via a turbine wheel. Hence the term “two-shaft turbine.” These two shafts are not mechanically connected to each other. The second shaft thus receives mechanical drive power from the exhaust jet of the first stage. The second shaft rotates significantly slower than the first shaft. The mechanical transmission coupled to the second shaft thus operates at lower rotational speeds than if the mechanical power were taken from the first, high-speed shaft. This has a positive effect on the efficiency of the turbine engine.
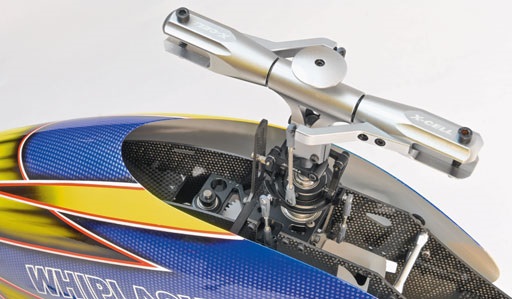
Actually, a turbine is easier to start up than a nitro or gasoline engine. Just program everything, flip the switch, and the turbine starts automatically thanks to the kerosene starting system.
But it’s not quite that simple after all. Once the helicopter has been properly adjusted mechanically, the Futaba CGY 760R can be programmed. The CGY combines a receiver, three-axis attitude stabilization, and a governor in a single unit that’s only slightly larger than conventional attitude stabilization systems. The menu navigation is very straightforward, and with the predefined values, nothing should go wrong. The settings are also applied to the integrated governor. The control settings (FUTABA) and those for the FUTABA CGY 760R are provided as “fail-safe” settings by Miniature Aircraft USA or swiss-scale-helikopter.ch.
After programming and a pre-flight check, nothing stood in the way of the maiden flight. The turbine starts cleanly and without any problems. Once the rotor has reached full speed, the helicopter is ready for takeoff. The helicopter hovered gracefully and with a hissing sound right in front of us from the very start; followed by the first control inputs to transition into a circuit flight. The control response is very direct, just as you’d expect from a trainer; load changes are barely noticeable. Roll maneuvers and loops were already being performed on the second flight. Care must be taken here to ensure it doesn’t become too “addictive.”
As previously mentioned, the Whiplash-T II was specifically designed and developed to be powered by a turbine engine. Whether used as a trainer for sightseeing flights or as a “purebred” 3D machine, the Whiplash-T II and the Whiplash Special Edition TS-45i-Heli-Turbine live up to all expectations.
Not least for this reason, Miniature Aircraft USA made history at the IRCHA 2020: Mitch Marozas (Team Miniature Aircraft) was the first pilot ever to compete with a turbine-powered RC helicopter. Flying the Whiplash-T II, he competed in the legendary 3D freestyle competition “Battle of the Brands” at the IRCHA in the U.S. His flight thrilled the spectators and demonstrated the capabilities of both the helicopter and the turbine. He achieved a more than successful 3rd place finish.
Photos: Michael Peer, Anton Laube


News from HEBU

TEAM MANAGER "THIS" BOSSHARD
 Rodito Nussbaumer

SUMMER FUN 2026 AT MG USTER
Martin Wunderli
TRY-OUT DAY AT MFV WETTINGEN
Urs Keller
52. 2026 ALPS CUP
 Emil Giezendanner

ATOM, THE NEW DOUBLE-DECKER FROM CPLR
 Matthias Bosshard

INSIGHTS INTO THE HISTORY OF SEAPLANES

YOU KNOW WHAT I MEAN? 125 YEARS OF THE SWISS AERO CLUB
Emil Giezendanner
34th HAHNENMOOS ALPINE MODEL AIRPLANE CAMP
Res Dauwalder
CORSAIR F4U – A WARBIRD WITH A MEMORABLE LOOK
Jürgen Rosenberger, Jürgen Prinz
SMALL, MODEL-LIKE SAILBOATS
Res Dauwalder
F3A EUROPEAN CHAMPIONSHIPS IN ST-MACAIRE, FRANCE
Matthias Bosshard
What's New at Leomotion.com

HORIZON HOBBY/LEMACO NEWS: MICRO OV-10 BRONCO 645 MM BY E-FLITE

PRIDE AND GOOD IDEAS
 Markus Nussbaumer

BY YOUTH, FOR YOUTH
Lorena Betschen
FREE FLIGHT IN THE MIDDLE OF SUMMER
Urs Muntwyler
THE PC-21 STORY
Emil Giezendanner
TWIN TOWN PARTNERSHIP
Wolfgang Voeller
EURO CONTEST GLIDER ACRO TOUR AUSTRIA 2026

WELCOME, NEW MEMBER!
Andrea Bolliger
COUPE DES ALPES – OBSERVE AND LEARN
Rodito Nussbaumer
NEWS FROM HEBU
 Julia Bucher

FROM 0 TO 100
Markus Nussbaumer
MEMORIES
Wolfgang Völler
NOS REGION – A HUB FOR ELECTRIC AVIATION
Emil Giezendanner
Have you almost forgotten about aircraft that take off and land vertically?
Emil Giezendanner
70 YEARS OF THE NIDWALDEN MODEL AIRPLANE CLUB
Martin Barmettler