
Super Phoenix, a large sailboat
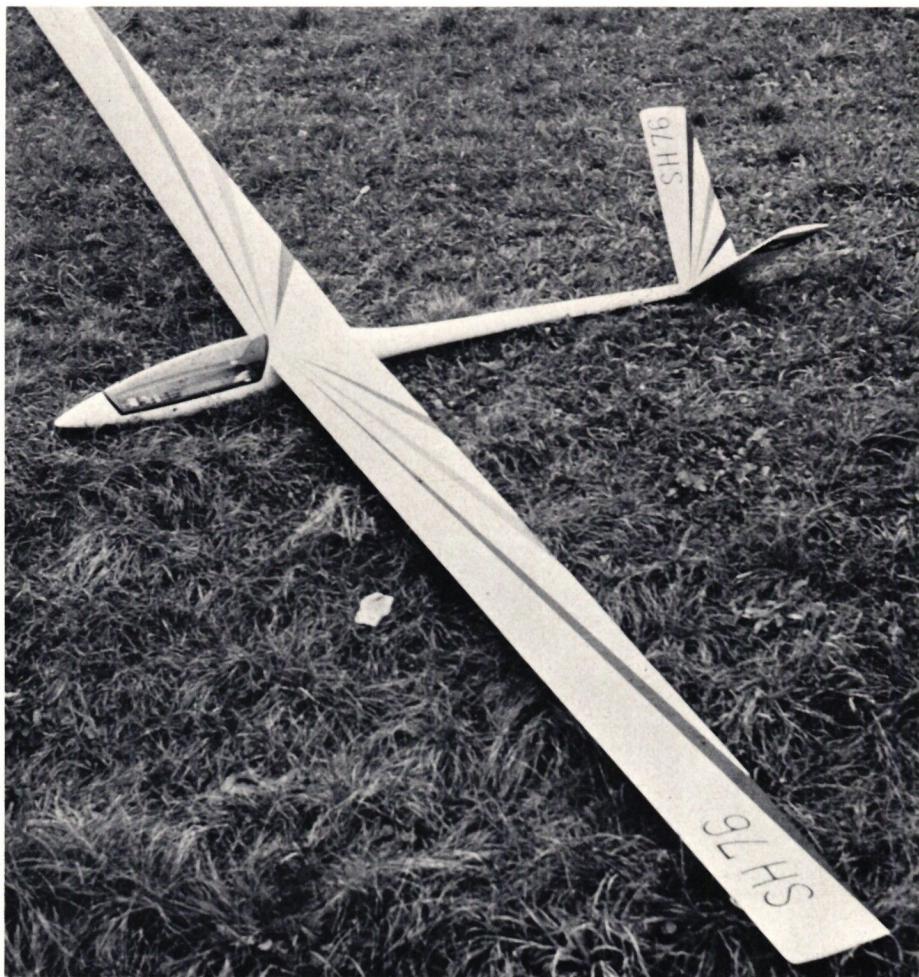
For some time now, I had been toying with the idea of designing and building a large glider myself. In my mind, I could already see the glider finished—ready for its first flight. It had to have a wingspan of five meters, weigh 3.8–4 kg, and feature a V-tail.
It soon became clear to me that this plan wouldn’t be so easy to carry out. By early summer 1976, the time had come—my decision was final: I would design and build a large sailboat.
I began collecting literature and studying everything that had anything to do with large sailboats. Any books I didn’t already own, I bought or borrowed from fellow club members. After thoroughly studying these books, I wasn’t really any wiser than before, because—with a few exceptions—what I had hoped to find wasn’t there. I found the Eppler airfoil books to be very good; I took the airfoils for my glider from them, and they also provided me with some other useful data. I wrote down all the knowledge I had acquired, but the bottom line was very meager.
I found absolutely nothing about gliders with V-tail configurations, except for existing models like the Salto, Briliant, Orlice, etc., with their standard wingspans. But I didn’t let that discourage me, because my glider had to have a V-tail—that’s how I’d envisioned it.
I began jotting down my thoughts and data on A3 graph paper. The wingspan was set at five meters. So all that was missing was what went in between. I went through an enormous amount of graph paper until I finally had a rough sketch on paper of what I had envisioned.
The first difficulties arose when I began sketching the fuselage at a 1:1 scale. Since space was limited in my three-room apartment (with no workshop), I had to go to the office instead. There, I had access to a drawing board large enough for the job. Once I had sketched out the rough outlines of the fuselage (after work, of course), a wave of dread washed over me. It was a massive structure, with dimensions I never would have imagined. I immediately realized that building such a colossus out of wood was out of the question for me.
I put the design on hold for a while and began sketching the wings. Here, too, I ran into the same problems as with the fuselage. It became clear to me—if not before, then certainly by now—that for a glider with a five-meter wingspan, a wing would be 2.5 meters long. There was only one solution for me: to divide the wings into four sections. In my design, I opted for two inner sections 1,500 mm long and two attachable outer sections 1,000 mm long, a configuration I maintained until the very end.
It turned out that this was a good choice, as the wings were easy to build at this size. I created a transparent drawing showing the wing’s outline and the rib layout. I didn’t want to commit to any details just yet, because, first of all, things often turn out differently, and second, not as you might expect.
For the wing profiles, I chose the Eppler profiles E 203–201–193, with the majority of the wing consisting of E 193. For the first time, I fabricated the ribs using the block method, which, to my surprise, turned out to be very simple and efficient. I started by working on the two outer wings, each 1,000 mm long. It is essential to build the wings with the utmost care to ensure they are completely free of warping; corrections at this length are virtually impossible later on. It is therefore advisable to construct a jig. With Eppler profiles, care must also be taken to ensure profile accuracy in the area of the leading edge and trailing edge, as otherwise the maximum lift values cannot be achieved. If the ribs are constructed using the block method, this should pose hardly any difficulties.
I needed significantly more work for the two inner wings due to the installation of the spoilers, which are highly recommended for a large glider. These are installed before the wings are covered, along with the corresponding Bowden cables for operating them. I covered the wings and tailplane with 2-mm balsa wood and then covered them with film. For the first time, I applied the film using a heat gun, which I highly recommend. This is the only way to achieve a flawless surface finish, which is also very important for the Eppler airfoils. Of course, this requires a cleanly sanded wing, free of sanding dust and sanding grit.
Covering the underside—which has a concave shape in the rear section of the wing—posed no difficulties at all. Here, immediately after heating the film, I rubbed it down with a soft cloth, which ensures perfect adhesion of the film in this area. The spoilers are covered at the same time as the wing and simply cut out afterward. The wings were finished for the time being, and now I could turn my attention back to the fuselage.
In the meantime, I had managed to get an epoxy fuselage from a clubmate, in the form of two half-shells. The size and shape were exactly what I had envisioned. I was one step closer to my goal. First, I had to get used to the length of the fuselage, because whenever I picked it up, I’d bump into either the ceiling or the wall.
Working on the half-shells was a bit unfamiliar to me—they still had excess material where they were separated—as was gluing the halves together, since I didn’t have much experience with this material yet. But I overcame this hurdle as well and gained a few more valuable experiences in the process.
There were no wing attachment points on the fuselage, which was a big plus for me. After gluing the fuselage together and sanding it down, I mounted it in flight position on a launch ramp; this allowed me to mark the exact installation angle and attachment points for the wings and tailplane. A few weeks passed before I was finally ready to attach the wings to the fuselage for the first time. Our living room was just big enough diagonally for this project.
My whole family was now gathered around my father’s creation, and my wife asked me, shaking her head, whether the thing would actually fly. To be honest, I wasn’t entirely comfortable either when I saw the glider lying there like that. My head was full of thoughts: Is the angle of attack correct
?
Are the wings stable enough?
And how large does the V-tail need to be so that this glider can be controlled well without ailerons?
To determine the dimensions of the V-tail, I looked for a ratio among existing models that I could then apply to my own model. But all my calculations were in vain—I couldn’t find that number. The differences were too great. I couldn’t find anything about V-tails in the literature either. I had no choice but to make a few prototypes out of plywood, in various sizes, and estimate by eye which one would fit the fuselage and wings. It was with mixed feelings that I built these two tail units; only later, while flying, did it turn out that I had made the right choice. The glider was finished except for the fine details, such as the canopy, installation of the control surfaces, and linkages.
I soon discovered that these fine details still took quite a bit of time. There were control linkages 1,600 mm long that I had to reinforce against bending, and I also couldn’t construct the canopy—which is actually quite large—using conventional methods.
By the end of November, the time had finally come: my large glider, the Super Phoenix, was finished. After carefully determining the center of gravity, I placed it on the scale. It showed a flight weight of 4,450 g, which resulted in a wing loading of 37.87 g/dm². I think I have reason to be satisfied.
The following Saturday was the big day. At 9:15 a.m., Fritz Frankhauser (our club president, who had given me a few tips during the build), Paul Kübler (who had provided me with the fuselage), and I were standing at our powered model airfield in Neuhausen am Rheinfall. The glider was ready for its first glide flight. We did a final check of the control surfaces—and what did we discover? The rudder was connected the wrong way. What I’d only ever heard others talk about—and was sure would never happen to me—had come to pass. The mishap, which made everyone smile, was quickly fixed on the field.
After I’d taken the traditional first photo of the glider, nothing stood in the way of its first glide flight. I had my hands full holding the glider against the wind, which was blowing cold and gusty across the field. The weather conditions weren’t exactly ideal for the first glide flight.
I waited for a good moment and took off running. After a few meters, I let the glider take to the air. I was very curious to see how it would react. Aside from having too much elevator input—which I corrected with the control stick—nothing else happened. After about 25 meters, it touched down on the runway again.
After I corrected the elevator to its neutral position, several more glide flights followed, all of which went to everyone’s satisfaction. Unfortunately, the weather conditions didn’t allow us to test the glider on the slope. Based on these glide flights, I was able to note the following points:
1. The glider flew, which was the greatest satisfaction for me.
2. The elevator response is very strong.
3. Glide angle is very good.
4. Angle of attack is OK.
5. Flight characteristics are fantastic.
I was very satisfied with the results and was very curious to see how the glider would perform on the slope. The following Saturday morning, we met at our slope-flying site. The wind conditions were practically ideal, but everything was shrouded in fog.
After about an hour of impatient waiting, the fog finally cleared. We were all very eager to see how the glider would respond to the rudder. After the first flight on the slope, all doubts vanished. The rudder response is excellent. It reacts immediately and recovers well from a side slip. The flight characteristics exceeded all my expectations. As far as flying is concerned, the transition from a 3.5-meter to a 5-meter wingspan wasn’t a big adjustment for me. Landing is a slightly different story. Here, you mustn’t underestimate the airspeed. It’s advisable to take a wide approach to landing. The spoilers proved to be a valuable aid here; in my opinion, they are indispensable for a glider with a wingspan over 3.5 meters.
In conclusion, I can say that this glider has fully met my expectations in terms of flight performance, controllability, and handling. It’s always a wonderful experience to fly such a large glider.
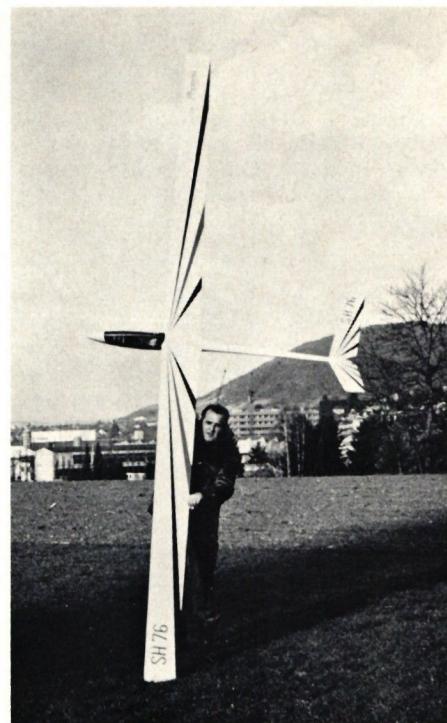
B. Ferri emigrated to South America shortly after this report was written, so we are unable to obtain any further information about the model.


TEAM MANAGER "THIS" BOSSHARD
 Rodito Nussbaumer

ATOM, THE NEW DOUBLE-DECKER FROM CPLR
 Matthias Bosshard

INSIGHTS INTO THE HISTORY OF SEAPLANES

34th HAHNENMOOS ALPINE MODEL AIRPLANE CAMP
Res Dauwalder
CORSAIR F4U – A WARBIRD WITH A MEMORABLE LOOK
Jürgen Rosenberger, Jürgen Prinz
SUMMER FUN 2026 AT MG USTER
Martin Wunderli
F3A EUROPEAN CHAMPIONSHIPS IN ST-MACAIRE, FRANCE
Matthias Bosshard
What's New at Leomotion.com

HORIZON HOBBY/LEMACO NEWS: MICRO OV-10 BRONCO 645 MM BY E-FLITE

PRIDE AND GOOD IDEAS
 Markus Nussbaumer

News from HEBU

YOU KNOW WHAT I MEAN? 125 YEARS OF THE SWISS AERO CLUB
 Emil Giezendanner

SMALL, MODEL-LIKE SAILBOATS
Res Dauwalder
TRY-OUT DAY AT MFV WETTINGEN
Urs Keller
52. 2026 ALPS CUP
Emil Giezendanner
THE PC-21 STORY
Emil Giezendanner
TWIN TOWN PARTNERSHIP
Wolfgang Voeller
EURO CONTEST GLIDER ACRO TOUR AUSTRIA 2026

BY YOUTH, FOR YOUTH
Lorena Betschen
WELCOME, NEW MEMBER!
Andrea Bolliger
FREE FLIGHT IN THE MIDDLE OF SUMMER
Urs Muntwyler
COUPE DES ALPES – OBSERVE AND LEARN
Rodito Nussbaumer
NEWS FROM HEBU
 Julia Bucher

FROM 0 TO 100
Markus Nussbaumer
NOS REGION – A HUB FOR ELECTRIC AVIATION
Emil Giezendanner
MEMORIES
Wolfgang Völler
Have you almost forgotten about aircraft that take off and land vertically?
Emil Giezendanner
70 YEARS OF THE NIDWALDEN MODEL AIRPLANE CLUB
Martin Barmettler