
Looking for a match
Nothing ruins the look of a glider more than a poorly fitting canopy. This is especially true when it’s made of clear material, needs to be glued to its frame, and its edge needs to be painted. What’s the proper way to go about this?
Admittedly, I can’t remember how long it’s been since I had to do this kind of work. In the ARF era, these kinds of parts usually come to customers fully assembled. That’s not the case with the Vettore—it still requires some model-building. If approached methodically and with care, however, it’s not rocket science. It does, however, require a great deal of patience—something the “canopy craftsman” should bring to the table. As for the model-building process, here’s how to do it.
The first step is to transfer the exact contour of the fuselage contact point onto the canopy to create a guide line. And modern glider fuselages, with their curved canopy contact points, present entirely different challenges than vintage gliders with straight contours. The roughly cut clear canopy is positioned, aligned, and secured with masking tape. This requires a fully functional canopy frame; it must therefore be equipped with all fasteners, and the canopy latch must already be installed in the fuselage.
Now it’s time to use the scalpel; with it, we trace the contour of the frame support, applying light pressure. Once that’s done, the canopy must be removed with scissors for trimming. We carefully cut along the marked line using a pair of smaller scissors.
Driven by curiosity and wanting to double-check, frustration sets in when I try to fit the cut-to-size canopy. It doesn’t fit—it’s still too big. How is that possible? The explanation is quite simple: In this first fitting, it rests on the fuselage, and the fuselage is oversized relative to the canopy frame. There’s nothing left to do but repeat the entire process. But don’t worry—we’re almost there.
The scissors follow the new outline—only a little material needs to be cut away—and bring us almost to the finish line. “Almost” because our canopy still won’t fit perfectly in some places. Because no one can achieve the exact local radius with just a pair of scissors.
At this stage, you determine where material still needs to be removed by repeatedly placing the piece on the surface and marking it. Larger protrusions—which are fairly rare at this stage—can be trimmed with scissors; otherwise, the sanding block does indeed come into play. With soft plastic? Yes, it works, and it’s actually the only way to shape the hood’s edge correctly. However, there are a few things to keep in mind. The clear hood must rest on a soft surface; the sanding block is covered with 80-grit sanding cloth, and the resulting sanding dust must not be wiped away under any circumstances, as this will immediately cause scratches. “Blowing it off” is the magic phrase—those with a compressor have an advantage. In any case, this process is repeated until the canopy fits as precisely as possible. Under no circumstances should it protrude anywhere or be too large. A slight undersize, on the other hand, isn’t a big deal. We’ll get to that later. But first, the hood needs to be “married” to its fiberglass frame—that is, glued in place. To do this, the inside of the hood—the area where it will be glued—must be carefully roughened up. Once the sanding dust has been removed, you must ensure that, once the adhesive is applied, the canopy sits correctly on the first try—otherwise, corrections will be needed, and the adhesive will be smeared. While everything is still dry—with the frame on the fuselage and the canopy precisely positioned—drill a blind hole through the canopy and frame at the center of both the front and rear, into which a guide pin is inserted in each case. Once everything is in place, it’s time to bond them together.
The adhesive of choice is Uhu Plus Endfest, thickened with microballoon—a consistency like viscous honey is ideal—and applied to the edge of the canopy frame with the pointed tip of a lancet. Under no circumstances should you try to apply the adhesive emulsion to the sanded canopy edge, as tiny “glue beads” would immediately fly into the canopy because it is statically charged. The fuselage has already been generously treated with release wax several times; the canopy is clean; the frame is seated on the fuselage; and the guide pins are in place. Now everything depends on how precisely the canopy can be slipped over the two pins. People with four hands have an advantage. But since those don’t exist, the author asks his wife for help—after all, this is a wedding. Once the canopy is properly seated, it’s first secured with a few strips of masking tape. The pins are removed, and our little couple is left to dry—thoroughly, because otherwise the entire assembly will be difficult to detach from the fuselage.
The next day is when things get exciting. The frame-canopy assembly generally resists more tentative attempts to remove it. However, light taps along the edge of the fuselage with the palm of your hand will loosen it. Therefore, it’s advantageous if no frames or servo boards have been installed yet, so it can give a little. Trim the canopy, remove excess adhesive by sanding it off, and try fitting it on to see how it fits. Even if the work was done as precisely as possible, we’ll still need to apply additional resin. This is done now with epoxy resin, again mixed with microballoon; the fuselage has been thoroughly waxed again before fitting the resin-coated canopy. The resin emulsion is applied only to the previously marked areas and must be fully cured before proceeding to the final steps.
And those steps are: sanding down any excess material and checking the fit. If everything looks good, we can move on to painting the canopy edge. After masking the area with special automotive-grade masking tape, we sand the canopy edge. It’s fine to use slightly coarser sandpaper; 100-grit works well. You’ll need to sand right up to the masking tape, because paint won’t adhere to the otherwise smooth CAB surface. Neither will filler, and that’s the first thing to apply. Use a brush—after two coats, even coarser sanding marks will be filled in. If you want to do a really good job, remove the masking tape before starting this step and replace it. The reason: When sanding the edge of the hood, it’s almost impossible to avoid damaging the tape in one spot or another. And in those spots, you’ll inevitably end up with a rough paint edge.
No way—even though wet sanding is now necessary—to smooth out the filler—it’s done using a moderate amount of water. We sand until the filler layer is evenly smooth. Any spots that may have been sanded down a bit thinner are insignificant; they just need to be smooth. Before we move on to the final edge painting, we have to reapply masking—everything, in fact—because overspray is a real sneaky little bugger; it settles everywhere.
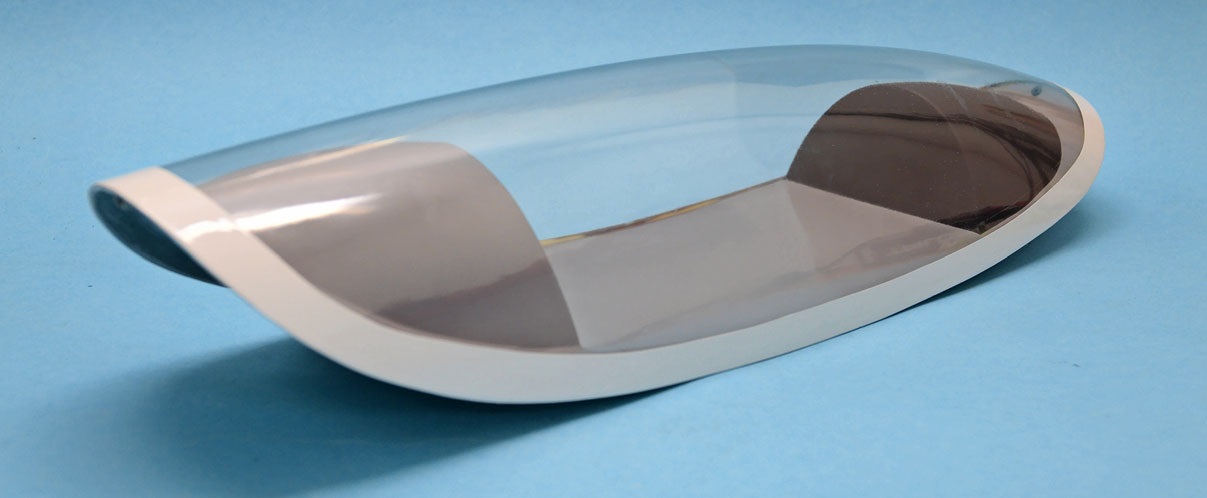
So, now we’ve finally reached the last step: painting. White (RAL 9003) matches the white gelcoat on our fiberglass hulls perfectly. If you have a compressor and a spray gun and know how to use them, you’re good to go. This is how the author does it: he uses two-component paint and applies two light coats to the component, which has been meticulously cleaned beforehand. Under no circumstances should you try to apply an opaque coat in a single pass! The paint will just run off. Let it dry thoroughly—up to 15 minutes, depending on the temperature—and then apply a full coat to achieve a glossy finish. Don’t apply too much; that will just create a thick edge. If you can’t do it this way, feel free to switch to spray cans—these usually contain single-component paint, but that works too. Or hire a professional auto painter. It’s helpful if you have one in your club. The paint must be completely dry; only then can the canopy be skinned and its protective covering removed. The orange painter’s masking tape shown in our example is applied last and peeled off at the sharpest possible angle, as demonstrated with the instrument panel. The “aha” moment comes when you place the canopy on the fuselage and see the perfect fit shown in the picture.


News from HEBU

TEAM MANAGER "THIS" BOSSHARD
 Rodito Nussbaumer

SUMMER FUN 2026 AT MG USTER
Martin Wunderli
SMALL, MODEL-LIKE SAILBOATS
Res Dauwalder
TRY-OUT DAY AT MFV WETTINGEN
Urs Keller
52. 2026 ALPS CUP
 Emil Giezendanner

ATOM, THE NEW DOUBLE-DECKER FROM CPLR
 Matthias Bosshard

INSIGHTS INTO THE HISTORY OF SEAPLANES

YOU KNOW WHAT I MEAN? 125 YEARS OF THE SWISS AERO CLUB
Emil Giezendanner
34th HAHNENMOOS ALPINE MODEL AIRPLANE CAMP
Res Dauwalder
CORSAIR F4U – A WARBIRD WITH A MEMORABLE LOOK
Jürgen Rosenberger, Jürgen Prinz
F3A EUROPEAN CHAMPIONSHIPS IN ST-MACAIRE, FRANCE
Matthias Bosshard
What's New at Leomotion.com

HORIZON HOBBY/LEMACO NEWS: MICRO OV-10 BRONCO 645 MM BY E-FLITE

PRIDE AND GOOD IDEAS
 Markus Nussbaumer

BY YOUTH, FOR YOUTH
Lorena Betschen
FREE FLIGHT IN THE MIDDLE OF SUMMER
Urs Muntwyler
THE PC-21 STORY
Emil Giezendanner
TWIN TOWN PARTNERSHIP
Wolfgang Voeller
EURO CONTEST GLIDER ACRO TOUR AUSTRIA 2026

WELCOME, NEW MEMBER!
Andrea Bolliger
COUPE DES ALPES – OBSERVE AND LEARN
Rodito Nussbaumer
NEWS FROM HEBU
 Julia Bucher

FROM 0 TO 100
Markus Nussbaumer
MEMORIES
Wolfgang Völler
NOS REGION – A HUB FOR ELECTRIC AVIATION
Emil Giezendanner
Have you almost forgotten about aircraft that take off and land vertically?
Emil Giezendanner
70 YEARS OF THE NIDWALDEN MODEL AIRPLANE CLUB
Martin Barmettler