
Archaeopteryx
I “Googled” light gliders online. That’s where I first saw the Archaeopteryx. It was something completely new to me. Soon I also found some short videos of this glider. I was immediately captivated by the way it flew. I searched for all the available information on this light glider. On the website of the manufacturer, Ruppert-Composite, I also saw the version with a fully enclosed cockpit. That was my inspiration.
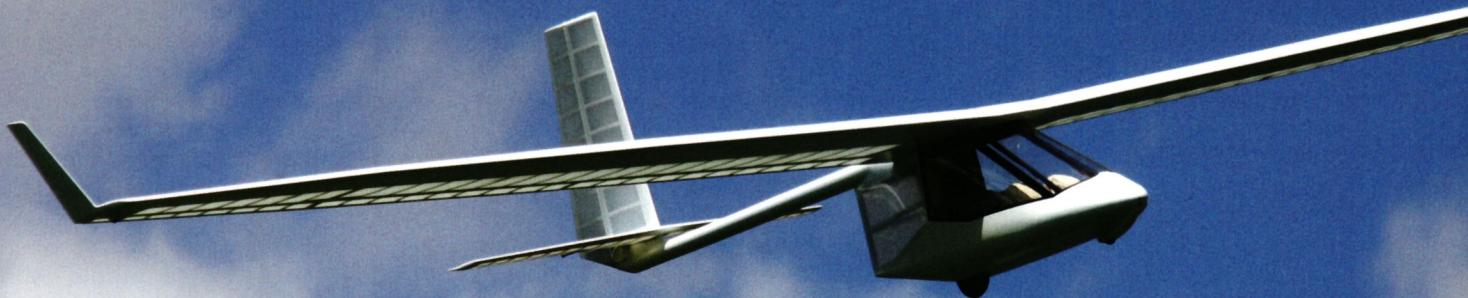
In the summer of 2009, I began thinking again about which model I should build during the upcoming winter building season. After building the ASK-18 on a 1:2.5 scale, the Woodstock on a 1:2 scale, and the SB14 on a 1:3 scale, I realized that the large, “chunky” models are the best fit for me. You can see them clearly even from a greater distance, and they fly quite steadily. Models like the SB14 simply have a silhouette that’s a bit too slender for my taste. There are lighting conditions where they seem to vanish into thin air in the sky. They become visible again when they fly a turn. Still, those are very unpleasant and long seconds.
How big should the model be? The criteria were my old Styrofoam cutting machine, which can cut wing depths of up to 56 cm, and the car, which has a loading length of 3 m. Based on these key figures, I arrived at a scale of 1:2.25.
It was clear to me from the start that I couldn’t build the model “full scale.” But once in the air, it was supposed to be an Archaeopteryx. The original is a fantastic lightweight, so I wanted to make an effort to build the model as light as possible. That means using plenty of carbon fiber and being sparing with the resin.
To make the fuselage tube, I first had to cut out a Styrofoam mold. I pulled three fabric tubes over this mold, coating each one individually with resin. Inside was a carbon-Kevlar tube, over that a carbon tube, and finally a glass tube—because after lamination, a lot of material had to be sanded down again to achieve a smooth surface. To let it cure, I hung the whole thing from the ceiling. To ensure the tube remained straight, I tied a weight of about 1 kg to the protruding fiberglass tube. The next morning, I scraped out the Styrofoam using various tools. In the end, I had to use a ski pole with a file attached to it to clean out the fuselage tube. I couldn’t calculate the cost of materials for this tube. So I tested its strength the simple way. I placed this fuselage section on two trestles. Carefully, I braced myself against it in the middle. The fuselage tube held my weight, so at a rough estimate, that should be enough.
For the wing connector, I used an aluminum tube with a 26 mm diameter and filled it with carbon fiber rovings. The sleeves for the connector in the fuselage and the wings consist of three fabric tubes: glass fiber on the inside, followed by two layers of carbon fiber. I laminated these directly onto the aluminum tube, which I had thoroughly waxed beforehand. For the rear fuselage end cap, I fabricated a molded Styrofoam part. The elevator and ailerons are then mounted to this piece. Two layers of 93 g carbon fabric had to be laminated over this molded part. After curing, the foam had to be scraped out here as well. Gluing this part to the fuselage tube had to be done very precisely, since this is where the adjustment angle of the elevator was determined. A box made of a carbon-fiber honeycomb sandwich supports the wheel on the fuselage tube.
Next, I had to build the cockpit. I glued the cockpit frame together from carbon tubes. To prevent the tubes from bursting under load, I laminated a carbon tube over each one. These trapezoidal frames are glued to the spar connector sleeves. All these bonded joints were reinforced with carbon roving and small pieces of fiberglass cloth. The trapezoids still had to be connected with crossbars, and the cockpit frame was complete. Next, I had to build the formwork around this frame. To do this, I cut and sanded a positive mold of the cockpit out of Styrofoam. I reinforced the finished foam mold with two layers of fiberglass cloth. After sanding and thoroughly waxing it, the mold was complete. Now the underside of the cabin could be laminated with fiberglass cloth. The shell, cut to size and sanded, was then glued to the cabin frame. I made all the rods for the window frames from 6-mm Depron strips covered with carbon tubes. To ensure these strips took on the correct curves, I let them cure at the appropriate points on the cockpit positive mold. For the front cockpit windows, I was able to use 0.8 mm-thick transparent PET material from the hardware store. I covered the rear windows with transparent Oracovern.
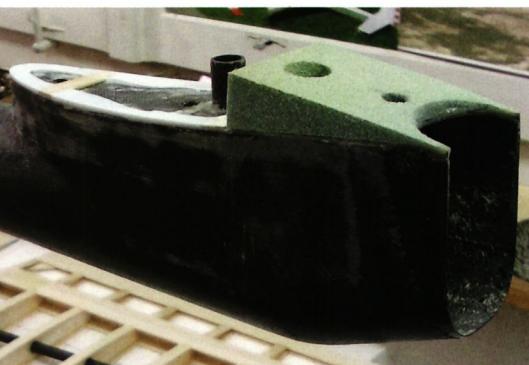
I also wanted the wing to be lightweight yet sturdy. How could I achieve this?
Up until now, I’ve built wings using a polystyrene-abachi sandwich construction. The Archaeopteryx was to have a shell-type wing.
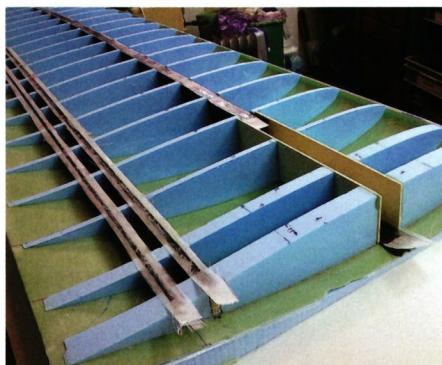
The goal was to achieve a weight of about 3 kg per wing (it ended up being 3.5 kg). For the negatives, I used Styrofoam with a density of 29 grams. After cutting the wing cores, the five individual pieces had to be glued together to form the full length of the wing. It was essential that the upper and lower negatives be aligned so that they coincided exactly. They served as a mold for producing the two half-shells. After gluing them together, I filled in the small irregularities on the negatives with lightweight filler. Sanding these areas proved impossible, as the foam is much softer than the lightweight filler. To avoid further damage to the negatives, I stopped sanding. I had to touch up these imperfections later on the wing shell. The half-shells consist of 1.2 mm thick Airex panels. They were coated on both sides with 105 g of glass cloth (diagonal weave). Laminating the fiberglass cloth onto the Airex panels was quite a difficult task due to the large surface area—a total of 2.6 m² on both sides. Working alone was a bit overwhelming, since both sides had to be coated at the same time. I used an epoxy resin with a 90-minute pot life. Next, the laminate had to be placed into the negative mold. I created the vacuum using a thin cover sheet. The best way to detect small leaks during sealing is with your ears—provided your ears can still pick up those faint air sounds. My wife has better hearing and showed me where I still needed to seal holes. After 24 hours of curing, I was initially pleased with the rather nice surface of the half-shell. My joy didn’t last long, though. I checked how well the fiberglass mesh adhered to the Airex panel. The entire laminate peeled off the Airex like a tear-off sheet. Apparently, the process of laminating and creating the vacuum caused the resin’s working time to be exceeded, so proper adhesion could no longer be achieved. Into the trash it went! I couldn’t have done the whole job any faster. So I looked for a resin that would give me more time. At R&G, I found a resin with a 200-minute working time. That was enough. I was able to build the four shells using the new resin. Next, I had to cut the ribs out of the wing core with a hot wire,
| Wingspan | 13.6 m | |
| Length | 5.7 m | |
| Height | 2.9 m | |
| Wing area | 12.8 m² | |
| Empty weight | Standard version | 54 kg |
| Full cockpit fairing | Race version | 6.7 kg |
| Total Rescue System | 5.5 kg | |
| Wing Loading | max. | 12.8 kg/m² |
| Takeoff weight | max. | 164 kg |
| Pilot height | Comfort | 1.65 m–1.95 m |
| Pilot weight | min. | 55 kg |
| max. | 100 kg | |
| Load factor during maneuvers | Pos. | + 4.0 g |
| neg. | –2.0 g | |
| Max. load factor during gusts | Pos. | +5.1 g |
| neg. | –3.1 g | |
| Minimum speed | 30 km/h | |
| Maximum speed | Permitted (Vne) | 130 km/h |
| Maneuvering speed | max. | 85 km/h |
| Minimum rate of descent | 0.5 m/s | |
| Glide ratio | Best | 28 |
| with flap at 70° | 5 |
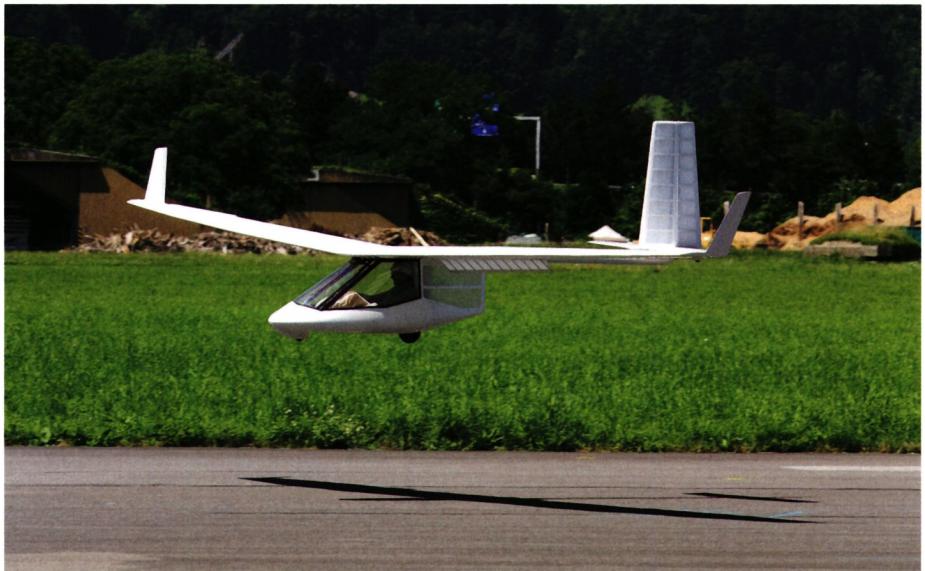
The elevator and ailerons were constructed using a standard rib structure. Styrofoam molds made this process easier. The spars are made of carbon fiber tubes. I used white Oralight to cover the tail surfaces.
Sunday, July 18, 2010, Tun Towing Field, Interlaken. After about eight months of intensive work, my Archaeopteryx model was finished. Andy Wespi was standing by as the tow pilot. His electric-powered Rascal is incredibly powerful. Would my Archaeopteryx fly the way I’d hoped? It did! After a few meters of towing, the model practically leaped into the air. I had to make a sharp downward adjustment with the trim. At an altitude of about 300 meters, I released the tow rope, and the Archaeopteryx was in its element. It was a wonderful feeling to be able to fly the model for the first time. During a flight lasting about half an hour, I was able to test its excellent flight characteristics. Tests with more weight revealed even better, more stable flight behavior. It’s wonderful to take advantage of even weak, small thermals by circling very slowly. With the ailerons set, you can really push this to the limit. For landing, the landing flaps can be extended fully. This also allows for a steeper yet still slow approach.
In the meantime, my Archaeopteryx has logged many flight hours. If you like to take it easy, it’s a great model!
Ruppert Composite GmbH
Sagenrainstrasse 4
CH-8636 Wald, Switzerland
| Wingspan / Envergure | 600 cm |
| Fuselage Length / Longueur du fuselage | 255 cm |
| Wing depth at the fuselage / Emplanture | 55 cm |
| Wing area / Surface alaire | 262 dm² |
| Wing loading / Charge alaire | 54 g/dm² |
| Weight approx. / Poids env. | 14 kg |
| Profile | HQ3/12% to HQ3/10% |


News from HEBU

TEAM MANAGER "THIS" BOSSHARD
 Rodito Nussbaumer

YOU KNOW WHAT I MEAN? 125 YEARS OF THE SWISS AERO CLUB
 Emil Giezendanner

F3A EUROPEAN CHAMPIONSHIPS IN ST-MACAIRE, FRANCE
 Matthias Bosshard

52. 2026 ALPS CUP
Emil Giezendanner
PRIDE AND GOOD IDEAS
 Markus Nussbaumer

ATOM, THE NEW DOUBLE-DECKER FROM CPLR
Matthias Bosshard
CORSAIR F4U – A WARBIRD WITH A MEMORABLE LOOK
Jürgen Rosenberger, Jürgen Prinz
SUMMER FUN 2026 AT MG USTER
Martin Wunderli
TRY-OUT DAY AT MFV WETTINGEN
Urs Keller
TWIN TOWN PARTNERSHIP
Wolfgang Voeller
BY YOUTH, FOR YOUTH
Lorena Betschen
SMALL, MODEL-LIKE SAILBOATS
Res Dauwalder
What's New at Leomotion.com

HORIZON HOBBY/LEMACO NEWS: MICRO OV-10 BRONCO 645 MM BY E-FLITE

COUPE DES ALPES – OBSERVE AND LEARN
Rodito Nussbaumer
EURO CONTEST GLIDER ACRO TOUR AUSTRIA 2026

INSIGHTS INTO THE HISTORY OF SEAPLANES

34th HAHNENMOOS ALPINE MODEL AIRPLANE CAMP
Res Dauwalder
WELCOME, NEW MEMBER!
Andrea Bolliger
FREE FLIGHT IN THE MIDDLE OF SUMMER
Urs Muntwyler
THE PC-21 STORY
Emil Giezendanner
NEWS FROM HEBU
 Julia Bucher

FROM 0 TO 100
Markus Nussbaumer
MEMORIES
Wolfgang Völler
NOS REGION – A HUB FOR ELECTRIC AVIATION
Emil Giezendanner
Have you almost forgotten about aircraft that take off and land vertically?
Emil Giezendanner
DO YOU KNOW WHAT I MEAN IN THE LAND OF SMILES?
Emil Giezendanner