
Flying In and Trimming (Part 3)
The path to truly enjoying aerobatics has never been easy; in fact, it’s usually a particularly rocky one. Training, training, and more training—until you’re completely exhausted. And only those who are willing to put themselves through that can become a decent aerobatic pilot. It doesn’t actually take much: discipline, an iron will, and a model that “flies straight.” With these three “virtues,” you can go quite far. Those who have the aerobatic knack—the talent—slumbering within them have an advantage.
The emphasis is, after all, on “art,” which means it’s the art of precise aerobatic maneuvers. But what exactly does such a maneuver consist of? Everyone knows a loop—it’s circular. If we turn it into a double Immelmann, two straight flight paths of equal length are inserted between them. It doesn’t matter whether rolls of any kind are incorporated or not. So we’re dealing with a sequence of straight lines and arcs. Is that all? Not quite, but most maneuvers currently known are composed of these elements.
Exceptions include snap rolls, spins, and, at most, the turn (renversement), because at its culmination point, it requires the model to rotate around its vertical axis. In the snap roll, if flown according to the rules, the tail of the model must wedge out—that is, briefly leave the straight flight path—and in the vrille, nothing is normal anymore. Our aerobatic pilot wobbles toward the ground while rotating around the vertical axis. That’s it.
Anyone who believes they can just whip out this ridiculous string of radii and straight lines, occasionally interrupted by the aforementioned figure passages that break the mold, can just whip it out off the cuff will have to take this self-inflicted lash of everyday life. At the beginning, pretty much everything will go wrong. So we need a method—a training method, to be precise.
If you fly into a maneuver at an angle, you can’t finish it straight. At least not without a clearly visible correction. And that’s exactly what we need to avoid. So the first thing we’ll learn is to fly straight, and we’ll quickly discover that this is anything but easy. It’s the most difficult maneuver of all! So first, we’ll fly the shortest path between two points, and that happens to be a straight line. From one edge of the field to the other. And the turn is what matters—because if you turn at an angle, you can’t come out of that turn straight, but flying parallel to the runway is THE absolute necessity. →
- 1 Square Loop
- 2 Half Reverse Cuban Night
- 3 Slow Roll
- 4 Turn
- 5 Double Immelmann with half rolls
- 6 Humpty Bump
- 7 Four-count roll
- 8 Half Loop with Half Roll at the Top
- 9 Three-rotation spin
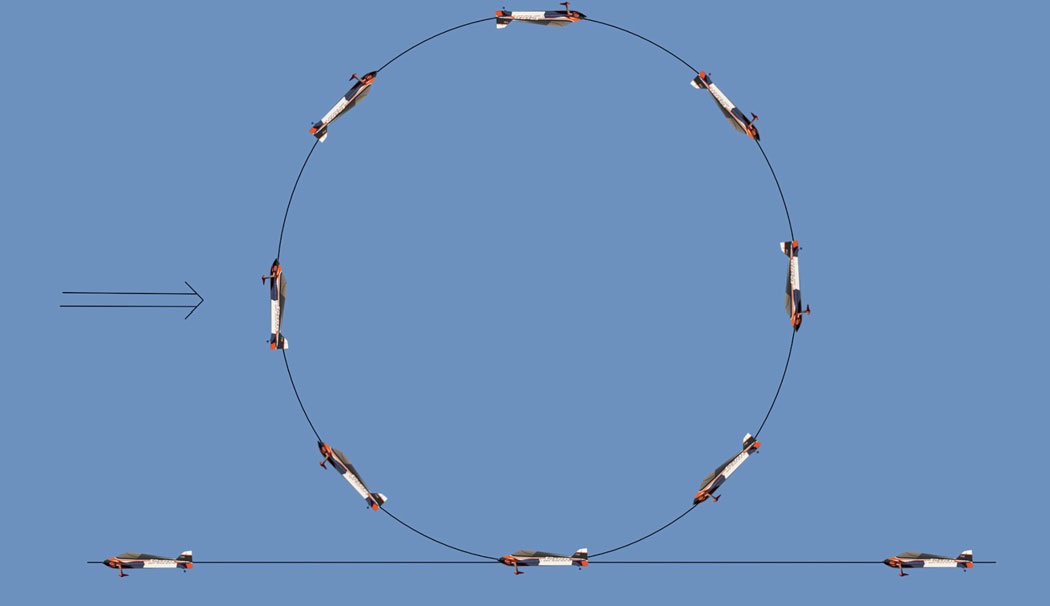
But we have to turn around and then fly back to the turnaround point on the other side of the field. Straight! Not away from us, not toward us. Always at the same altitude. We can see how important it is to make a clean turn, because if we mess it up here, our model will come out somewhere—but never where it’s supposed to. Keep the wing level. Fly the turn. Fly out with the wing level and continue past us in a straight line. Always maintain the same altitude and distance. Practice, practice, practice. No one is born a master. This applies to everything that’s still to come—and there’s a lot. What’s been said here applies to wind parallel to the runway.
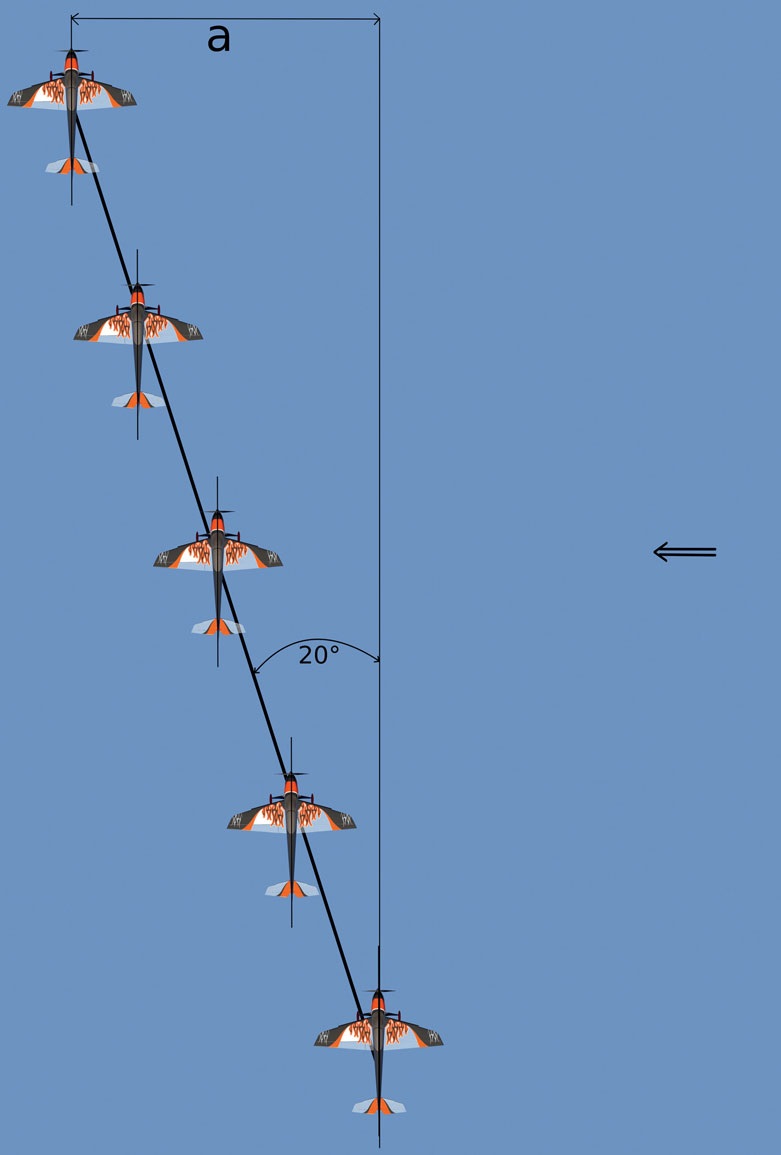
With a crosswind, things look different. Whether the crosswind is blowing into our faces or at our backs—and thus trying to influence the model’s flight path relative to the ground, i.e., toward or away from the pilot—we need to fly at a lead angle, technically known as the windward angle. Depending on the wind strength, it may also be sufficient to fly with the wing slightly angled into the wind. Normally, however, the rudder will come into its own. Here, too, the saying holds true: practice makes perfect. Before a sequence of maneuvers can be flown, the individual maneuvers must be practiced. So, to keep the back-and-forth flying from getting too tedious, now that flying straight past the pilot—including the turn—is working out pretty well, we’ll incorporate a loop in the headwind flight path and a roll maneuver in the tailwind. Ah, learned something new again—so there are maneuvers that are best flown with or against the wind. That’s right.
But it’s just as true that there are maneuvers where it doesn’t really matter, because you have to navigate sections both against and with the wind. A practical example is a Cuban night with half rolls. Approach into the wind, a three-quarter pulled loop, 45-degree descent, half roll, 45-degree descent (the same length as before the half roll), three-quarter pulled loop—and what do we have now? Downwind. The wind is now blowing onto the upper surface of the wing, trying to push the aircraft forward, which is compensated for by pulling the controls a little harder and applying throttle earlier. The maneuver is completed with a second half roll, a descent to the approach altitude, and exiting by pulling the controls.
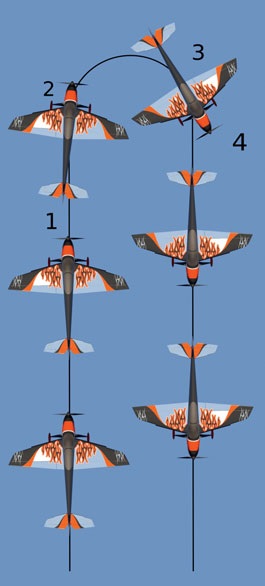
It looks so simple, but when flown perfectly, it’s anything but simple. The precise reduction of throttle, the correct timing of the rudder input, and the deliberate, slow release of this all-important control must merge into a symbiotic whole—becoming second nature to the pilot. Our diagram shows what to control and when, so that the turn becomes a true turn and doesn’t end up as a mere “hip swing.” The BeMod states: The model must not turn more than one and a half wing spans at the upper apex. Huh? How is one supposed to measure that from the ground up, with both feet firmly on the ground? You can’t—it’s purely a matter of interpretation. But what does that mean for the pilot? Under no circumstances should you fly a visibly large radius. That’s why reducing throttle and applying the rudder at the right moment are so important.
We’re flying a turn as a turn, to the pilot’s left. Straight approach, full throttle, pull up to vertical and climb vertically. At point 1, slowly reduce throttle to about a quarter. The model loses speed. At point 2, slowly but continuously apply rudder to full deflection while simultaneously and slowly reducing throttle all the way to point 3. The model performs a turn; hold the rudder until a clearly vertical downward trajectory is reached, then slowly return the rudder to neutral. Point 4.
If you release the rudder too quickly or too early, the model will oscillate around the vertical axis or veer off at an angle. If the model is still traveling too fast when the rudder is applied, the one-and-a-half wing spans will be significantly exceeded. The hip swing is complete—resulting in a score of zero.
It’s important to fly. Depending on wind strength, it may also be sufficient to fly with the wing slightly tilted into the wind. Normally, however, the rudder will want to come into its own. Here, too, the saying applies: practice makes perfect. Before a sequence of maneuvers can be flown, the individual maneuvers must be practiced. So, to keep the back-and-forth flying from getting too tedious, now that flying straight past the pilot—including the turn—is working out pretty well, we’ll incorporate a loop in the headwind flight path and a roll maneuver in the tailwind. Ah, I’ve learned something new again—so there are maneuvers that are best flown with or against the wind. That’s right.
But it’s just as true that there are maneuvers where it doesn’t really matter, because you have to navigate sections both against and with the wind. A practical example is a Cuban night with half rolls. Approach into the wind, a three-quarter pulled loop, 45-degree descent, half roll, 45-degree descent (the same length as before the half roll), three-quarter pulled loop—and what do we have now? Downwind. The wind is now blowing onto the upper surface of the wing, trying to push the aircraft forward, which is compensated for by pulling the controls a little harder and applying throttle earlier. The maneuver is completed with a second half roll, a descent to the approach altitude, and exiting by pulling the controls.
There’s no wind! At least not for an aircraft that’s in the air, whether manned or remote-controlled. What there is, is wind relative to the ground, and we can feel that. The aircraft, however, doesn’t feel it; it moves with the wind relative to the ground—at least from the perspective of the RC pilot standing on the ground. That’s why the rudder is so important in precision aerobatics, because the goal is to always perform the maneuvers at a consistent distance from the pilot.
Let’s say we’re riding in a hot air balloon, and the balloon is traveling at wind speed. What do we hear? Nothing! Except for the typical sound that occurs when I light a tobacco pipe with a match. It’s burning. Where does the smoke rise? Answer: Straight up. No wind!
Second example: Suppose the balloon is traveling at 20 km/h because that’s the current wind speed. A sparrow is flying alongside the balloon at a top speed of 15 km/h. Can it circle the balloon basket? If the reader answers “yes” now, they’ve got the hang of how wind works!
This also applies to turns and maneuvers, which have been mandatory since the introduction of the so-called turn maneuver program in 1984. Let’s take the classic “Turn” as an example of a turn maneuver. We have a crosswind coming toward us; now, in the vertical…
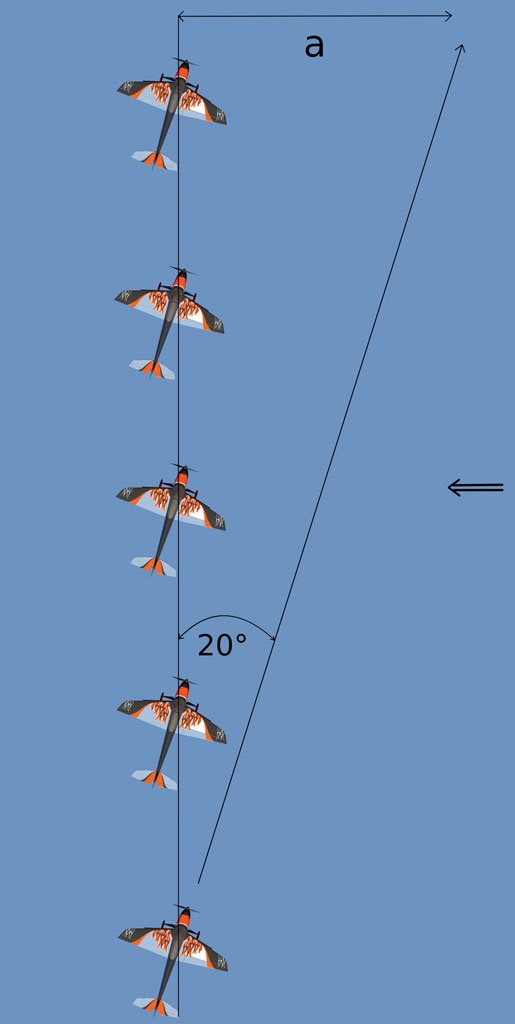
If we don’t maintain the flight path with the rudder, the aircraft will come closer to us. Then the intended distance is already ruined, and the next central maneuver—no matter what it looks like—will no longer be possible to execute correctly.
By “appearance” here, we don’t mean the quality of the maneuver, but rather whether a horizontal maneuver (roll) or a vertical one (loop) is required. If we’re too close or too far out, we’ll have to adjust the model’s distance during the approach. And that is severely penalized by the judges with point deductions! If this central maneuver is flown too close (or, conversely, too far away), points are also deducted. In this case, the following turn MUST be used to correct the distance, maneuvering the model back to where it belongs.
So, after this brief foray into competitive flying, let’s move on to practicing maneuvers. At this stage, it’s very practical to put together a beginner’s program. Nine maneuvers are enough to start with; five of these are central maneuvers, because you always begin flying into the wind with a maneuver in the center—that is, in front of the pilot. In the separate box, I’ve listed a sequence of maneuvers that works well as a smooth, fluid practice routine. Included are a Turn and a Humpty Bump as turns, since they also serve as wind-correction maneuvers. It would go too far to explain the individual maneuvers here; that’s what the Aresti catalog is for, which explicitly describes every single aerobatic maneuver currently known. It’s even better to watch an aerobatics competition—that way, you’ll immediately see how the individual maneuvers should be flown and what they should look like when performed at a high level of skill.
It’s an advantage to have a like-minded partner who not only calls out the maneuvers but also pays attention to spatial positioning and any necessary corrections. It’s simply better as a pair. And as you get better and better at flying a routine, that unique sense of accomplishment becomes a source of joy and—
encourages you to tackle even more challenging maneuvers. But: The path to perfect aerobatics never ends; only continuous training leads to consistently good flights. With that in mind: Have fun flying with precision.
*Ralph Müller*
*All graphics from aeroFly RC7, courtesy of Ikarus Modellsport*
Let's assume that the distance from point A to point B is 100 meters. We have a crosswind. Our model reaches 80 km/h at full throttle; there is no headwind. The drift over ground therefore occurs throughout the entire flight distance and flight time. Now let’s perform this exercise with an aircraft that’s twice as fast. What happens? The faster aircraft will also drift relative to the ground, but only half as much as its slower counterpart. Here, too, weight plays no role at all—only airspeed matters. At both speeds, however, a lead must be maintained to prevent drift: more for the slower model, less for the faster one.
If a pilot can fly this beautiful maneuver really well, the other roll maneuvers will also come quickly. Reason: The control inputs are the same; they just happen at slightly different times. Take the four-point roll, for example. But now we’re going to practice a slow roll.
Approach from the right, roll to the right. Straight approach, slowly apply a little aileron at point 1 until the desired roll speed is reached. Hold the stick firmly; at Point 2, slowly apply a little left aileron, hold it until past the nose-down position, then slowly release the aileron while simultaneously applying a little elevator, Point 3; maintain elevator until past the inverted position, then slowly return to neutral and apply a slight right aileron. Point 4. Hold the aileron to the right past the inverted flight attitude and slowly release it; Point 5. Immediately release the aileron stick upon reaching the normal flight attitude. The model “locks into” the normal flight attitude.



What's New at Leomotion.com

PRIDE AND GOOD IDEAS
 Markus Nussbaumer

News from HEBU

TEAM MANAGER "THIS" BOSSHARD
 Rodito Nussbaumer

34th HAHNENMOOS ALPINE MODEL AIRPLANE CAMP
Res Dauwalder
CORSAIR F4U – A WARBIRD WITH A MEMORABLE LOOK
Jürgen Rosenberger, Jürgen Prinz
SUMMER FUN 2026 AT MG USTER
Martin Wunderli
F3A EUROPEAN CHAMPIONSHIPS IN ST-MACAIRE, FRANCE
 Matthias Bosshard

52. 2026 ALPS CUP
 Emil Giezendanner

TWIN TOWN PARTNERSHIP
Wolfgang Voeller
EURO CONTEST GLIDER ACRO TOUR AUSTRIA 2026

BY YOUTH, FOR YOUTH
Lorena Betschen
ATOM, THE NEW DOUBLE-DECKER FROM CPLR
Matthias Bosshard
INSIGHTS INTO THE HISTORY OF SEAPLANES

YOU KNOW WHAT I MEAN? 125 YEARS OF THE SWISS AERO CLUB
Emil Giezendanner
SMALL, MODEL-LIKE SAILBOATS
Res Dauwalder
TRY-OUT DAY AT MFV WETTINGEN
Urs Keller
WELCOME, NEW MEMBER!
Andrea Bolliger
HORIZON HOBBY/LEMACO NEWS: MICRO OV-10 BRONCO 645 MM BY E-FLITE

FREE FLIGHT IN THE MIDDLE OF SUMMER
Urs Muntwyler
THE PC-21 STORY
Emil Giezendanner
COUPE DES ALPES – OBSERVE AND LEARN
Rodito Nussbaumer
NEWS FROM HEBU
 Julia Bucher

FROM 0 TO 100
Markus Nussbaumer
NOS REGION – A HUB FOR ELECTRIC AVIATION
Emil Giezendanner
MEMORIES
Wolfgang Völler
Have you almost forgotten about aircraft that take off and land vertically?
Emil Giezendanner
70 YEARS OF THE NIDWALDEN MODEL AIRPLANE CLUB
Martin Barmettler