
Tips and Tricks for Building Your Own GRP/CFRP Chassis
They still exist—those model airplane enthusiasts who can build and craft things themselves, rather than just flying model airplanes built by Eastern Europeans or the Chinese. Often, these models are even more beautiful than anything one could make oneself, but they just aren’t homemade.
So this is an article for a shrinking minority, but as we know, minorities in Switzerland are cherished, supported, and sometimes even envied. After this slightly polemical introduction, let’s get down to business.
FRP and CFRP landing gear are relatively light and always return to their original shape even after a hard landing—unless they’re broken. The shape of the landing gear plays a decisive role here. Straight landing gear legs break more quickly than curved ones, since they can only flex sideways but not backward like the curved ones. A small mound or a hole in the runway is therefore much more dangerous for straight landing gear.
FRP and CFRP landing gear can be manufactured in various ways. My method is relatively simple and yields pleasing results. It is best suited for curved landing gear that is roughly shaped like a semicircle or a half-ellipse. To make a landing gear, we need a mold, sturdy PVC or polypropylene film, small boards, and, of course, laminating resin and fabric. I assume you are familiar with working with resin and fabric.
The mold consists of one thick (25–40 mm) or two thinner (12–19 mm) wooden boards. The cheapest ones will do—
such as particleboard or whatever else you have lying around. These are cut to the shape of the undercarriage using a band saw, adding a few centimeters to the height at the bottom end of the undercarriage.
If you’ve cut two thinner panels, glue them together exactly parallel, with three wooden blocks in between. Next, glue the single thick panel or the two thinner panels over the curve using a 2-mm birch plywood strip that is the width of the chassis plus 3–4 cm, using white glue (grain direction across the curve). Make sure the plywood lies flush against the edges of the panels without any gaps. If the mold has significantly varying radii, large holes can be drilled in advance at a distance of 5 cm from the edge to allow for the use of small screw clamps.
Next, sand the plywood surface smooth and cover it with a glossy self-adhesive film. If you want to laminate multiple landing gear assemblies at the same time, make the mold correspondingly wider.
Now attach a strip of sturdy film to the mold that is as wide as the mold and about 50 cm longer than the developed length of the
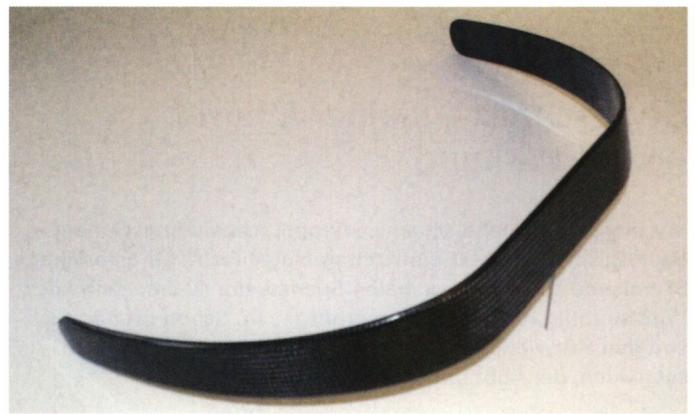
Tailored to fit the chassis. Next, the two support boards for the film, approximately 20 cm long, wider than the film, and at least 16 mm thick.
Depending on the size of the frame, it is recommended to use a heavier fabric, whether fiberglass or carbon. If the fabric is too light, it will take forever to achieve the desired thickness of the laminate. To get an idea of the number of layers needed for a specific thickness, stack a few layers of the fabric on top of each other and measure the thickness with a vernier caliper. To prevent the fabric from being compressed during measurement, place a small board or sheet of metal between the caliper and the fabric. Next, you’ll need to do some rule-of-thumbs calculations.
Now you can cut the required number of fabric strips, adding a 2-cm allowance to the width of the landing gear.
After placing the mold on a sheet of newspaper and treating it with a release agent, you can begin the lamination process. First, apply a thick coat of resin to the mold. Generously soak the fabric strips in resin—preferably on a sheet of newspaper—and then lay them on the mold. You can place 3–4 layers on the mold at a time, but don’t use the entire stack, or you risk the bottom layers forming wrinkles.
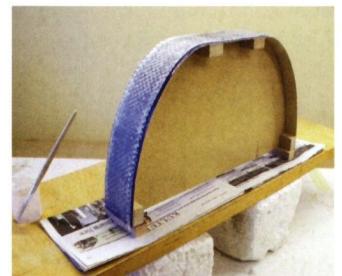
After the last strip of fabric has been placed on the mold, the strip of plastic film is placed in the center of the laminate. Next, place the clamping boards on the sides so that they rest on the film and can pull it down by about 5 cm (depending on the size of the landing gear). Make sure the taut film lies snugly against the laminate and the mold. Now, attach a screw clamp to each of the outer thirds of the clamping boards and tighten them until the clamping boards rest on the base plate. It’s best to use four hands for this task, since on both sides
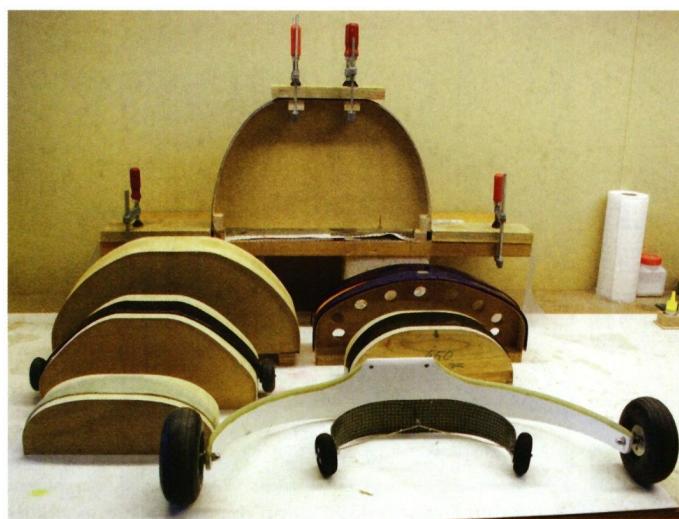
must be tensioned simultaneously with the mold.
Next, remove the excess resin and any air bubbles by carefully rolling a pipe or a thick screwdriver from top to bottom across the film. Repeat this process until no more resin pools form in front of the pipe or screwdriver. Finally, place a flat board with a weight or clamps on top to ensure the mounting surface is perfectly flat.
Then let the laminate cure.
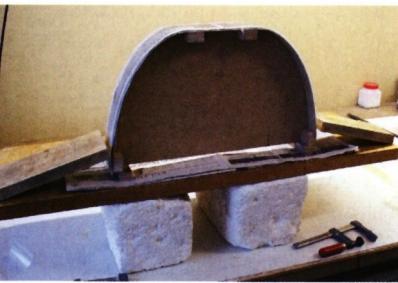
After molding, trimming, and sanding, the landing gear can still be tempered. This makes it harder and more stable. To do this, the landing gear is placed in Mom’s oven for 24 hours at 50°C–60°C.
She might not be too thrilled about the smell in the kitchen, but when it comes to model flying, everyone has to make a sacrifice now and then.
If the landing gear seems too hard and inflexible, you can reduce the width of the landing gear legs until it feels right.
If it seems too soft—whether made of glass or carbon—you can reinforce it with one or two carbon sleeves. To do this, vigorously roughen the surface with sandpaper and apply the carbon—
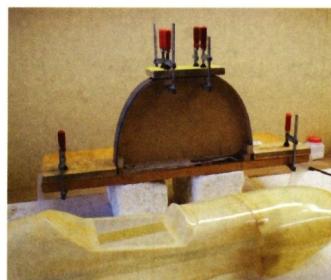
Pull the stockings over the landing gear and stretch them tightly by pulling the stocking lengthwise. Then thoroughly saturate the stocking with resin. To ensure that the underlying landing gear is also well-coated, you can further increase the resin’s viscosity using a hot-air blower. Next, the landing gear is placed over the mold, and a strip of plastic film is stretched over it again—tight enough so that the film rests directly on the edge of the landing gear against the mold. The excess resin on the surface, as well as along the edges, is then smoothed out.
After demolding, all that remains is to sand down the excess resin on the mold side along the edges. If you want a truly high-end finish, sand the edges with 2000-grit sandpaper and then polish the entire piece. The landing gear can now be tempered once more. If you’re aiming for a natural-looking carbon landing gear anyway, you’ll of course only temper it once at the very end.
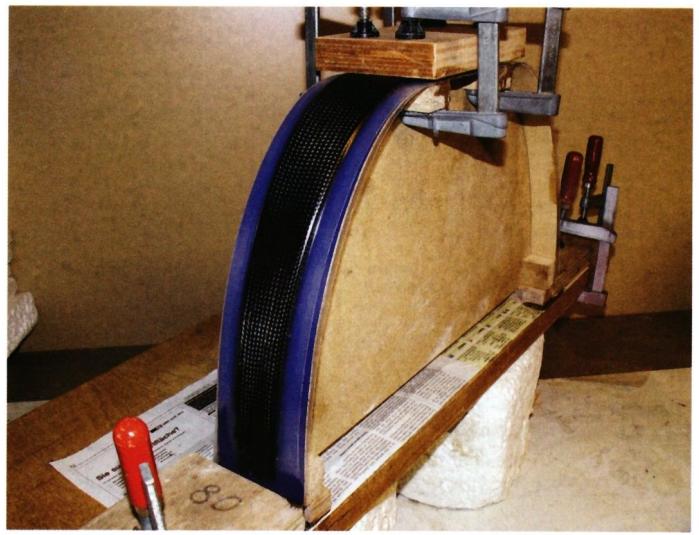
Now all that's left is to drill the holes for mounting and the wheel axles, and it's all done.
Most likely, a landing gear like this will
and be reused when the opportunity arises. That’s certainly been the case for me.
Pierre Bartholdi, MG Wehntal


TEAM MANAGER "THIS" BOSSHARD
 Rodito Nussbaumer

F3A EUROPEAN CHAMPIONSHIPS IN ST-MACAIRE, FRANCE
 Matthias Bosshard

News from HEBU

YOU KNOW WHAT I MEAN? 125 YEARS OF THE SWISS AERO CLUB
 Emil Giezendanner

SUMMER FUN 2026 AT MG USTER
Martin Wunderli
TRY-OUT DAY AT MFV WETTINGEN
Urs Keller
52. 2026 ALPS CUP
Emil Giezendanner
BY YOUTH, FOR YOUTH
Lorena Betschen
ATOM, THE NEW DOUBLE-DECKER FROM CPLR
Matthias Bosshard
CORSAIR F4U – A WARBIRD WITH A MEMORABLE LOOK
Jürgen Rosenberger, Jürgen Prinz
SMALL, MODEL-LIKE SAILBOATS
Res Dauwalder
What's New at Leomotion.com

TWIN TOWN PARTNERSHIP
Wolfgang Voeller
EURO CONTEST GLIDER ACRO TOUR AUSTRIA 2026

INSIGHTS INTO THE HISTORY OF SEAPLANES

34th HAHNENMOOS ALPINE MODEL AIRPLANE CAMP
Res Dauwalder
HORIZON HOBBY/LEMACO NEWS: MICRO OV-10 BRONCO 645 MM BY E-FLITE

COUPE DES ALPES – OBSERVE AND LEARN
Rodito Nussbaumer
PRIDE AND GOOD IDEAS
 Markus Nussbaumer

FREE FLIGHT IN THE MIDDLE OF SUMMER
Urs Muntwyler
THE PC-21 STORY
Emil Giezendanner
WELCOME, NEW MEMBER!
Andrea Bolliger
NEWS FROM HEBU
 Julia Bucher

FROM 0 TO 100
Markus Nussbaumer
MEMORIES
Wolfgang Völler
NOS REGION – A HUB FOR ELECTRIC AVIATION
Emil Giezendanner
Have you almost forgotten about aircraft that take off and land vertically?
Emil Giezendanner
70 YEARS OF THE NIDWALDEN MODEL AIRPLANE CLUB
Martin Barmettler