
Concorde
Homemade Depron model on a 1:50 scale
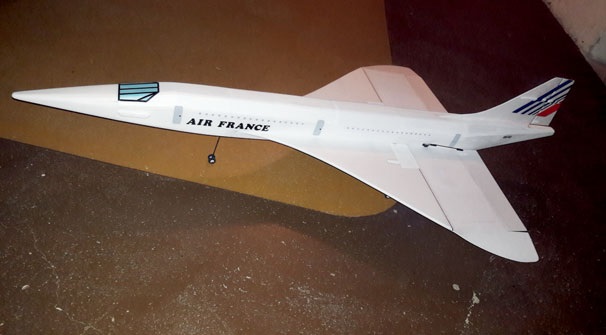
Encouraged by the success of my first self-built Depron model, the A-380—equipped with four impeller engines and small brush motors (recycled from a drone)—I decided to take on a larger aircraft. After building my first model from plans found online—the Eurofighter, with a delta wing that has excellent flight characteristics—I decided to tackle the construction of a Concorde.
Advantages of the Delta
The delta wing offers even more decisive advantages, especially for lightweight construction. It requires no tailplane, and the necessary wing strength can be achieved more easily with an extremely low aspect ratio. To control the aircraft along the longitudinal and lateral axes, only two servos are needed, operated by a mixer. The third servo controls the rudder and the nose wheel. I plan to equip the aircraft with a retractable landing gear, because the Concorde’s high landing gear significantly defines its appearance on the ground, and a ground takeoff in the hangar—well, that would be great, of course.
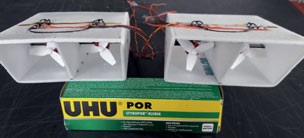
The first step was to find suitable engines so I could then design the twin-engine configuration. The size of these engines determined the 1:50 scale for the aircraft, though I increased the wingspan slightly to improve flight characteristics. I found the Brushless motors, including the drone propellers, at ALI in China (I searched online for a long time, but couldn’t find such small parts here in Switzerland or the EU). The motors have a bore of 15 mm and run on 2S LiPo batteries, each with its own ESC. The 3-blade propellers ( $∅$ 35 mm) spin at approximately 40,000 rpm and each generate a thrust of 50 grams. Once the engines had been fully tested and were sitting on the table, the scale and the maximum total weight of the aircraft were set. With a total thrust of 200 grams from the four engines, the finished Concorde was not to weigh more than 300 grams! So the task was clear: it had to be built extremely light, using only Depron and some CFRP profiles.
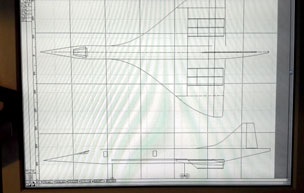
I drew the entire design in 2D on my computer, using a total of 28 A4 sheets at a 1:1 scale. After printing, everything was glued together; the individual paper parts were cut out and used as templates for cutting out the Depron parts with a knife. The fuselage bottom and the frames were made from 6 mm Depron; everything else was made from 3 mm Depron. The next step was to glue the components together correctly, for which I used only Depron (purple) superglue with an activator.
The wing is made from a single piece and has been thickened to 6 mm in the upper front half by gluing a piece of 3-mm Depron of the same size to it using spray adhesive. This creates a 3-mm step, similar to the KFm-2 profile from the Klein-Fogleman profile family. I have used this simple profile on all of my homemade Depron aircraft, and it has proven to be excellent. A 3 × 0.5 mm flat CFRP profile is then glued to the 3-mm step to reinforce the wing. After the wing has been glued to the bottom of the fuselage, the fuselage frames and the hollow nose can be attached. Next, fit the landing gear servos with their swivel mounts into the wing and glue them in place. Then I glued the vertical side panels to the fuselage frames. This was followed by the installation of the steerable and retractable nose landing gear as well as the entire radio receiver system. The aileron servos are glued directly into the fuselage side panels and connected to the large ailerons via short pushrods. Next, the horizontal top surface of the fuselage is glued in place, and the large rudder—reinforced with a CFRP profile—is mounted on top of it. The beveled side panels are fitted and glued in place only at the very end, after a functional test of the radio receiver system. The two twin engines are secured to the underside of the wing with double-sided tape. Then route the motor and servo cables neatly. I built the landing gear from 2 mm CFRP hollow profile with custom-machined aluminum parts to house the 2 mm steel wheel axles. To operate the landing gear, I had to retrofit KST mini-servos with metal gearboxes. The first version with plastic gears couldn’t withstand the load. I determined the center of gravity using a program from the Internet and then adjusted it based on the position of the 2-cell LiPo battery. To accommodate the battery, I cut open the upper fuselage at this point and installed a removable cover. Now it’s time for a lot of sanding to give the Concorde its elegant curves. It really is an extraordinary beauty. Now just a test of all the electronics, and then onto the scale. Total weight: 270 grams—great! Goal achieved—the plane will fly safely.
| Scale: | 1:50 |
| Wingspan: | 720 mm |
| Wing area: | 18 dm² |
| Wing profile: | similar to the Klein-Fogleman KFm-2 |
| Length: | 1250 mm |
| Overall height: | 300 mm |
| Fuselage diameter: | 80 mm |
| Weight ready to fly: | 270 grams |
| Material: | Depron, 3 and 6 mm thick (eflight) |
| Motors: | 4× brushless (Ali China) |
| Propellers: | 4× 3-blade drone propellers (Ali China) |
| Controllers: | 4× Gemfan Maverick High Speed 32-bit 48 MHz without BEC (Conrad) |
| BEC: | 2-cell LiPo to 5V (homemade) |
| Receiver: | Spectrum AR6310 (eflight) |
| Servo Landing Gear: | 3× KST X08V5 metal gearboxes/ball bearings (Brack) |
| Servo-controlled control surfaces: | 2× ePower 18 DigiServo (eflight) |
| Battery: | 2-cell LiPo 450mAh 30C NVision (Scamora) |
| Wheels: | 3× lightweight wheels (Scamora) |
| Adhesive: | ZAP-O Foam Safe CA purple with Foam Safe Kicker purple (Scamora) |
| Retractable main landing gear: | Homemade |
| Retractable, steerable nose landing gear: | Homemade (linked to the rudder) |
| Power requirements for the motors: | 8 amps at idle |
| Power: | Max. 50–60 watts at idle |
| Labor required: | Approx. 80 hours of interesting work |
and attach the hollow tip. Then fit the landing gear servos with their swivel bearings into the wing and glue them in place. Next, I glued the vertical side panels to the fuselage frames. Next came the installation of the steerable and retractable nose landing gear, as well as the entire radio receiver system. The aileron servos are glued directly into the fuselage side panels and connected to the large ailerons via short pushrods. Now the horizontal top surface of the fuselage is glued on, and the large rudder—reinforced with a CFRP profile—is attached to it. The beveled side panels are fitted and glued in place only at the very end, after a functional test of the receiver system. The two twin engines are
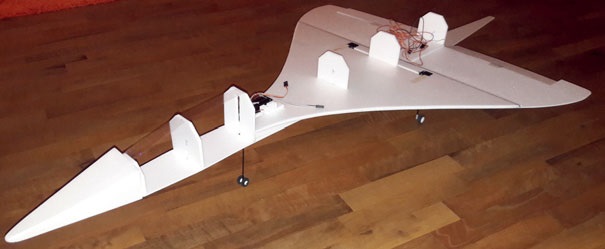
Attach them to the underside of the wing using double-sided tape. Then route the motor and servo cables neatly. I built the landing gear from 2 mm CFRP hollow profiles with custom-machined aluminum parts to hold the wheel axles, which are made of 2 mm steel. To operate the landing gear, I had to retrofit mini servos from KST with metal gearboxes. The first version with plastic gears couldn’t withstand the load. I determined the center of gravity using a program I found online and then adjusted it based on the position of the 2S LiPo battery. To accommodate the battery, I cut open the upper fuselage at this point and installed a removable cover. Now it’s time for a lot of sanding to give the Concorde its elegant curves. It really is an extraordinary beauty. Now just a test of all the electronics, and then onto the scale. Total weight: 270 grams—great! Goal achieved—the plane will fly safely.
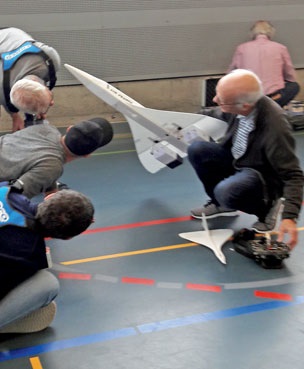
Here are a few more details: Color stripes on the rudder and doors with iron-on film, “AIR FRANCE” lettering applied with adhesive letters on both sides—it looks great. For the windows, I used a cardboard stencil with a felt-tip pen. To test whether the center of gravity and wing geometry were reasonably accurate, I built a glider about half the size. Then came the big day in Uster. The maiden flight was imminent. The glider flew quite well. The only thing standing in the way of my Concorde’s launch was my nerves. The taxiing test went well, and we were ready to go. The hangar suddenly felt extremely small—hopefully this will go well.
Full throttle, and the Concorde rolled away, took off, and climbed steeply—too steeply—into the air; I immediately cut back on the throttle, and it was back on the ground in an instant. Nothing happened; it’s just that the center of gravity is too far back. With the battery moved as far forward as possible and some extra weight attached to the nose with tape, it’s time for the second attempt. Mani is standing next to me and retracts the landing gear immediately after takeoff—I’d be overwhelmed on my own, because the plane would quickly crash into the nearest wall. So, another takeoff. Taxi and take off. The Concorde climbs rapidly at full throttle and banks elegantly into the first turn. Great—the plane flies quite well and handles turns smoothly. Then, after 4 to 5 laps, I give Mani the command: “Extend the landing gear.” One last turn, and with just a little throttle, we head in for the first landing. Two little bumps, but otherwise a pretty decent landing. Time to catch my breath! Enjoy the applause! I’m very satisfied, and thank you so much for being here and cheering me on.
Bruno Pfander


TEAM MANAGER "THIS" BOSSHARD
 Rodito Nussbaumer

SUMMER FUN 2026 AT MG USTER
Martin Wunderli
52. 2026 ALPS CUP
 Emil Giezendanner

ATOM, THE NEW DOUBLE-DECKER FROM CPLR
 Matthias Bosshard

INSIGHTS INTO THE HISTORY OF SEAPLANES

34th HAHNENMOOS ALPINE MODEL AIRPLANE CAMP
Res Dauwalder
CORSAIR F4U – A WARBIRD WITH A MEMORABLE LOOK
Jürgen Rosenberger, Jürgen Prinz
SMALL, MODEL-LIKE SAILBOATS
Res Dauwalder
F3A EUROPEAN CHAMPIONSHIPS IN ST-MACAIRE, FRANCE
Matthias Bosshard
What's New at Leomotion.com

HORIZON HOBBY/LEMACO NEWS: MICRO OV-10 BRONCO 645 MM BY E-FLITE

PRIDE AND GOOD IDEAS
 Markus Nussbaumer

News from HEBU

BY YOUTH, FOR YOUTH
Lorena Betschen
YOU KNOW WHAT I MEAN? 125 YEARS OF THE SWISS AERO CLUB
Emil Giezendanner
TRY-OUT DAY AT MFV WETTINGEN
Urs Keller
FREE FLIGHT IN THE MIDDLE OF SUMMER
Urs Muntwyler
THE PC-21 STORY
Emil Giezendanner
TWIN TOWN PARTNERSHIP
Wolfgang Voeller
EURO CONTEST GLIDER ACRO TOUR AUSTRIA 2026

WELCOME, NEW MEMBER!
Andrea Bolliger
COUPE DES ALPES – OBSERVE AND LEARN
Rodito Nussbaumer
NEWS FROM HEBU
 Julia Bucher

FROM 0 TO 100
Markus Nussbaumer
NOS REGION – A HUB FOR ELECTRIC AVIATION
Emil Giezendanner
MEMORIES
Wolfgang Völler
Have you almost forgotten about aircraft that take off and land vertically?
Emil Giezendanner
70 YEARS OF THE NIDWALDEN MODEL AIRPLANE CLUB
Martin Barmettler